Install Web Server Certificate for IIS 5.0
Your certificate will be sent to you by email. The email message includes the web server certificate that you purchased.
Copy the certificate from the body of the email and paste it into a text editor (such as notepad) to create text files.
Install your Web Server Certificate
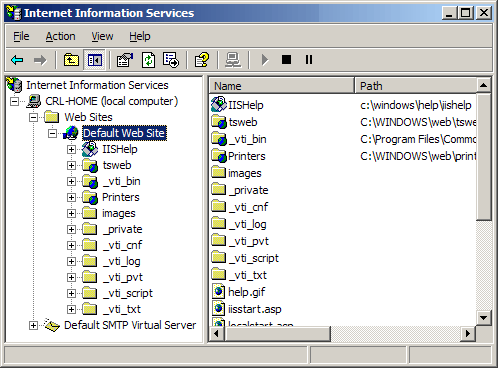
- Select the Internet Information Service console within the Administrative Tools menu.

- Select the web site (host) for which the certificate was made.
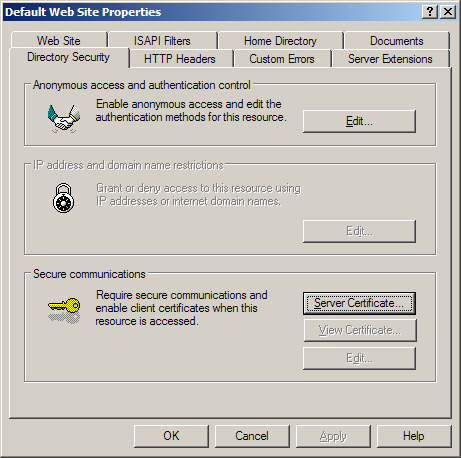
Right mouse-click and select Properties. - Select the Directory
Security tab.

- Select the Server Certificate option.
- The Welcome to the Web Server Certificate Wizard windows opens.
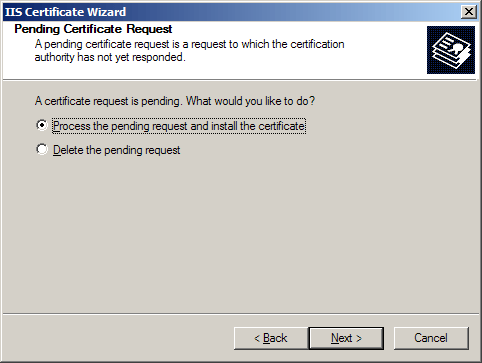
Click OK. - Select Process the pending request and install the certificate.
Click Next.

- Enter the location for the certificate file at the Process a Pending Request window. The file extension may be .txt or .crt instead of .cer (search for files of type "all files")
- After the correct certificate file is selected, click Next.
- Verify the Certificate Summary to make sure all information is accurate.
Click Next. - Select Finish.
- Select Web Site at the site properties window to edit your SSL Port 443 settings for this web server. Click OK.
Backing up your key pair file
Creating your Snap-in Management ConsoleCertificate Snap-in consoles (MMC) are not preconfigured. You will need to configure the Snap-in before you can perform any Export/Import functionality. To configure your Snap-in, follow the steps below. The system administrator will have to create the console.
- Go to Start. Select Run, Type mmc and click OK. This will bring up an empty console with no management functionality.
- Click on Console select Add/Remove Snap-in.
- The Snap-ins added to box will list only the Console Root. Click Add.
- Select Certificates and then click Add.
- Select Computer Account.
- Click on Finish.
- Click Close.
- Click on OK.
Managing your certificates
- Go to the Microsoft Management Console (MMC) and add the Snap-in for Certificates.
- Select the folders Console Root\Certificates(Local Computer)\Personal\Certificates.
- Right click on the certificate to export.
- Select All Tasks and Export.
- The Welcome to the Certificate Manager Import Wizard window opens.
Click Next. - Select Yes, export the private key. Click Next.
- Make sure the Personal Information Exchange- PKCS # 12 (.pfx) box is selected.
Warning: Make sure that the "Delete the private key if the export is successful" is NOT checked. - Check the box Enable strong protection requires IE5.0, NT4.0 SP4 or above. Select Next.
- Check the box to Include all certificates in the chain..
- Type and confirm your export password. (Note: this password field can be left blank, but we recommend using a good password for security).
Warning: If you lose the password, you must purchase another certificate.
Save the file to a disk or other form of media. You should choose a form of media that you would be able to recover if your system has to be rebuilt. Save this file in a secure location.
*** Microsoft has an alert addressing a problem with exporting and importing certificates.***
Service Pack 2 is intended to correct this problem. There is also a hotfix that may be obtained from Microsoft that must be run prior to exporting and importing your certificate. Please go to the following URL for more information or email us at support@ravand.com.
http://support.microsoft.com/support/kb/articles/Q261/6/55.ASP
Converting your trial certificates into .crt file format
You will need to open the certificates using Notepad. (You can find Notepad by going to the Start button at the bottom left hand corner of your screen, click on Run, type the word "notepad" and hit Enter.)
First open Your Trial Certificate and copy the information contained in the encrypted block, including the -----BEGIN----- and the -----END CERTIFICATE----- lines.
------BEGIN CERTIFICATE-----
(encrypted information)
-----END CERTIFICATE-----
Type "yourwebsite.crt" for the filename, and change the file saving type from Text (.txt) to All Files; then Save this file in a location which your server can access.
To convert your .crt file into Microsoft .cer format:
Double-click on the yourwebsite.crt file to open it into the certificate display. Select the Details tab, then select theCopy to file button. Hit Next on the Certificate Wizard. Select Base-64 encoded X.509 (.CER), then Next. Select Browse (to locate a destination) and type in the filename yourwebsite. Hit Save. You now have the file yourwebsite.cer


